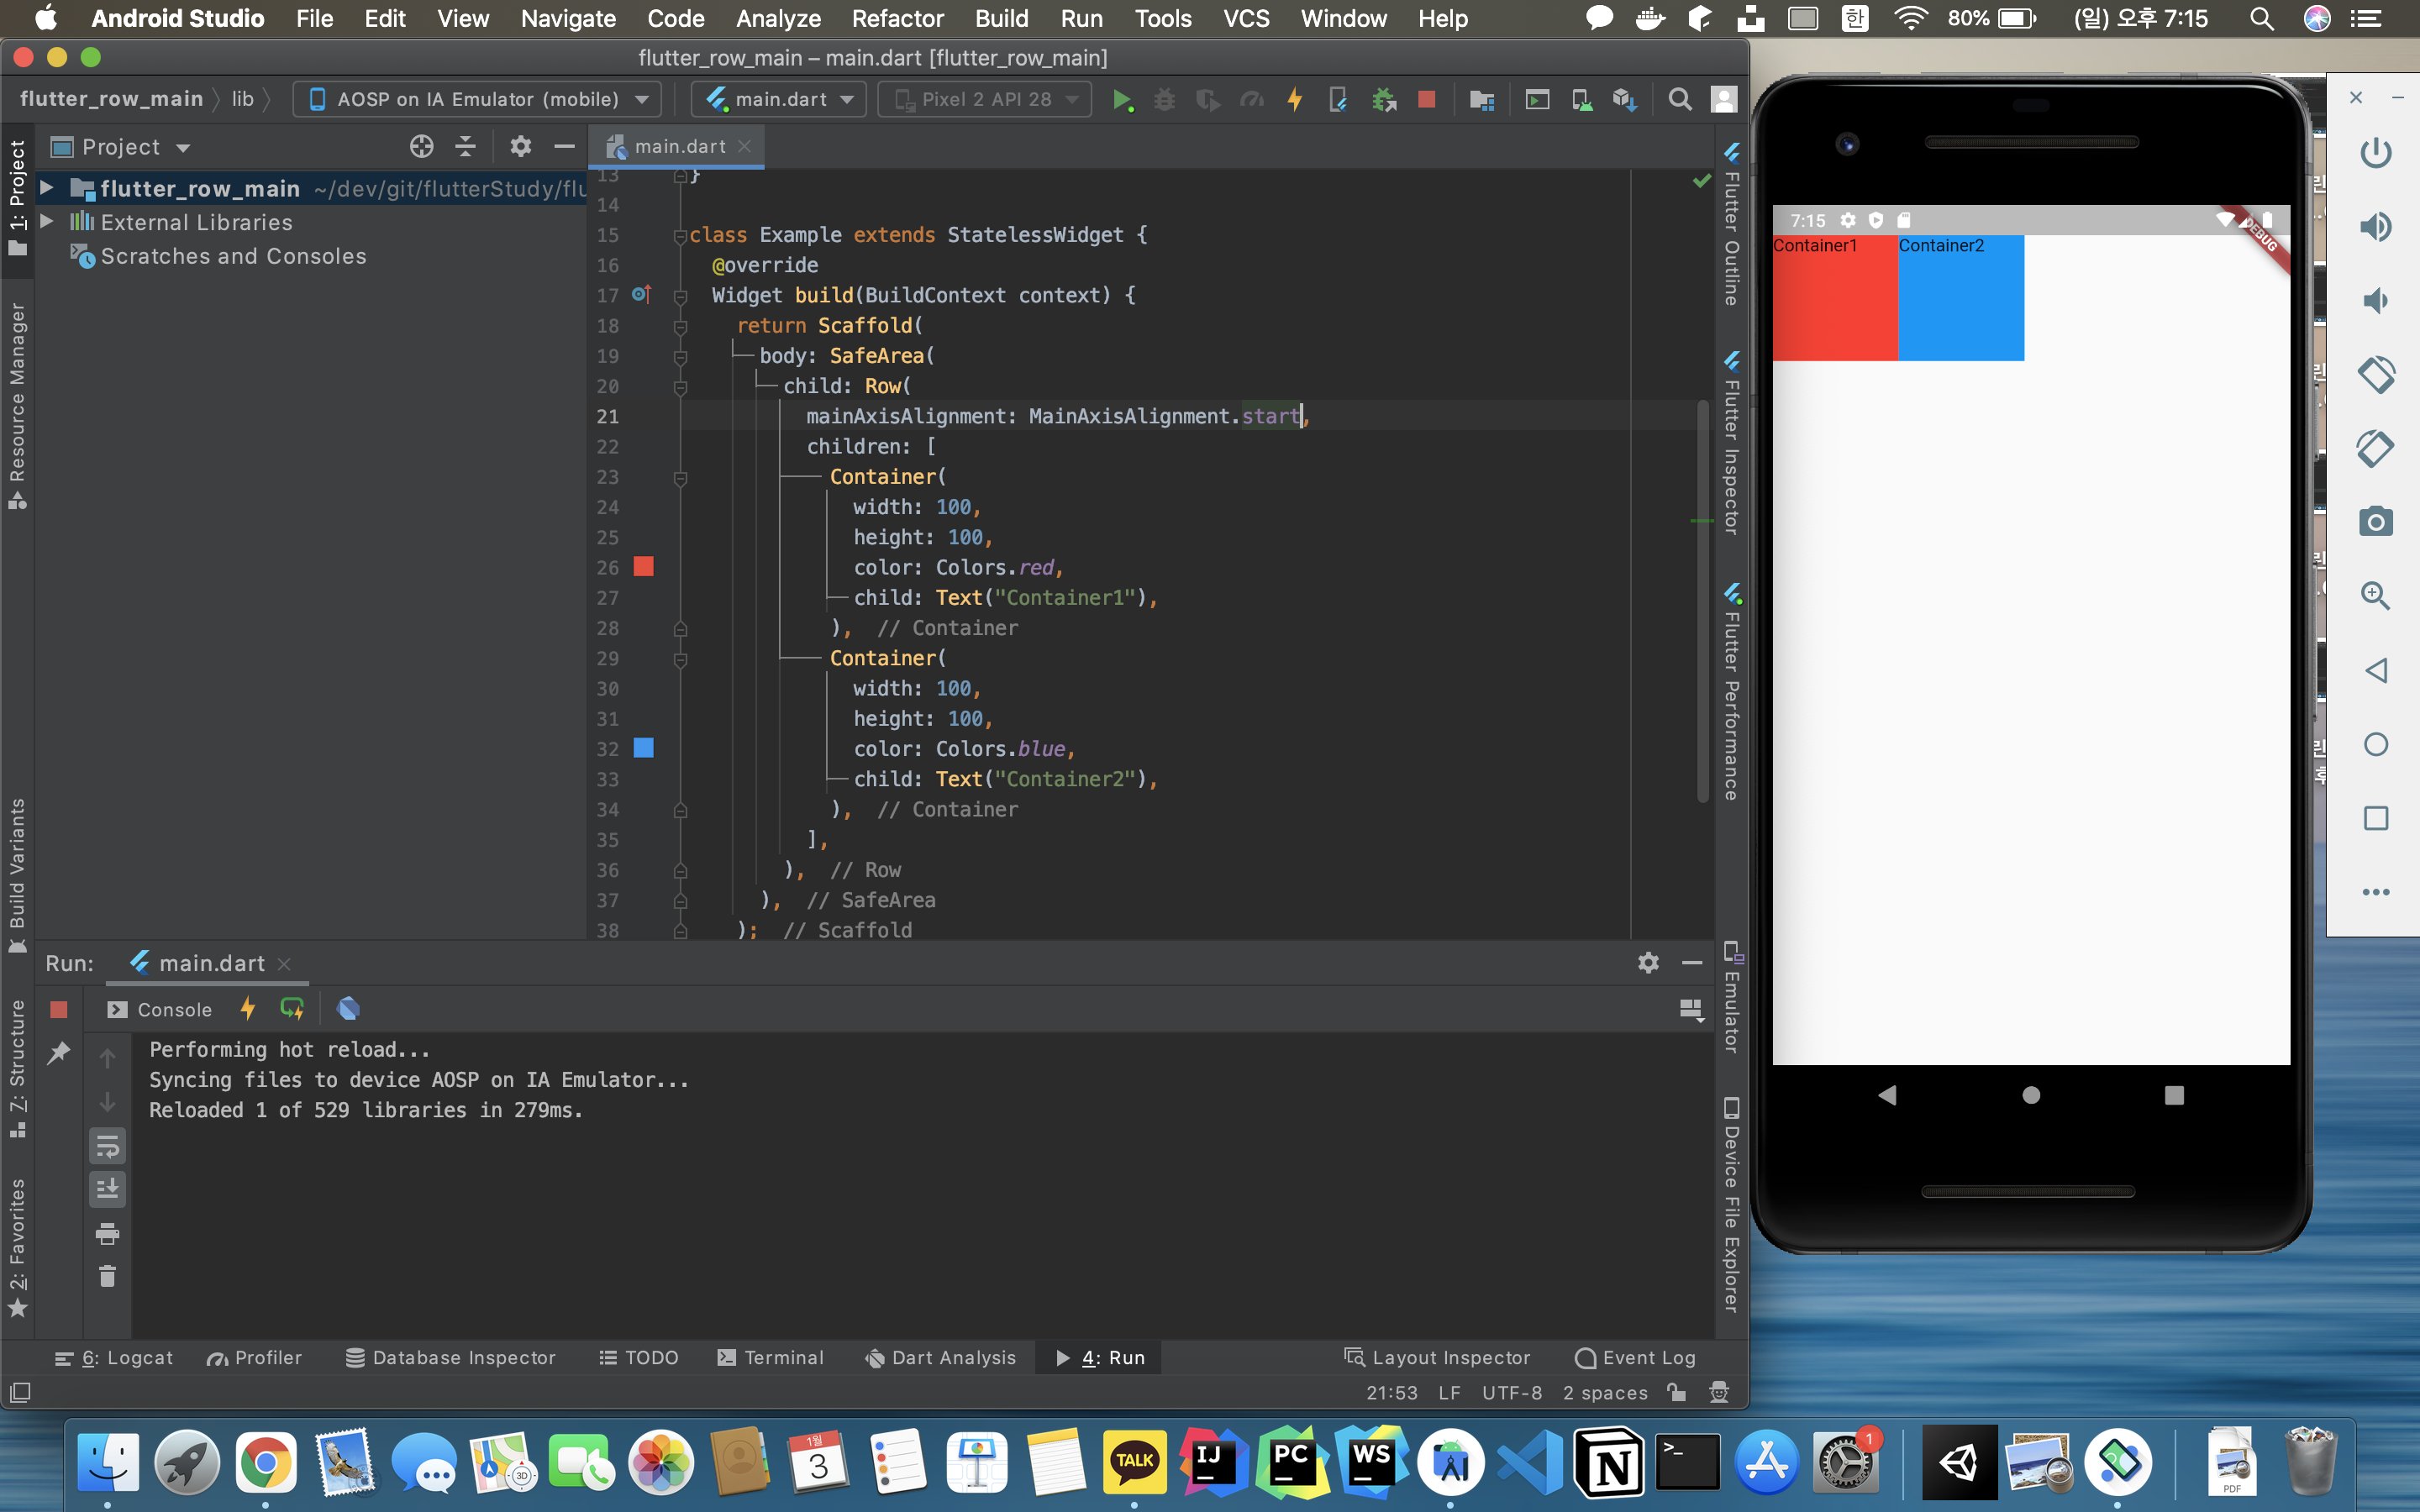
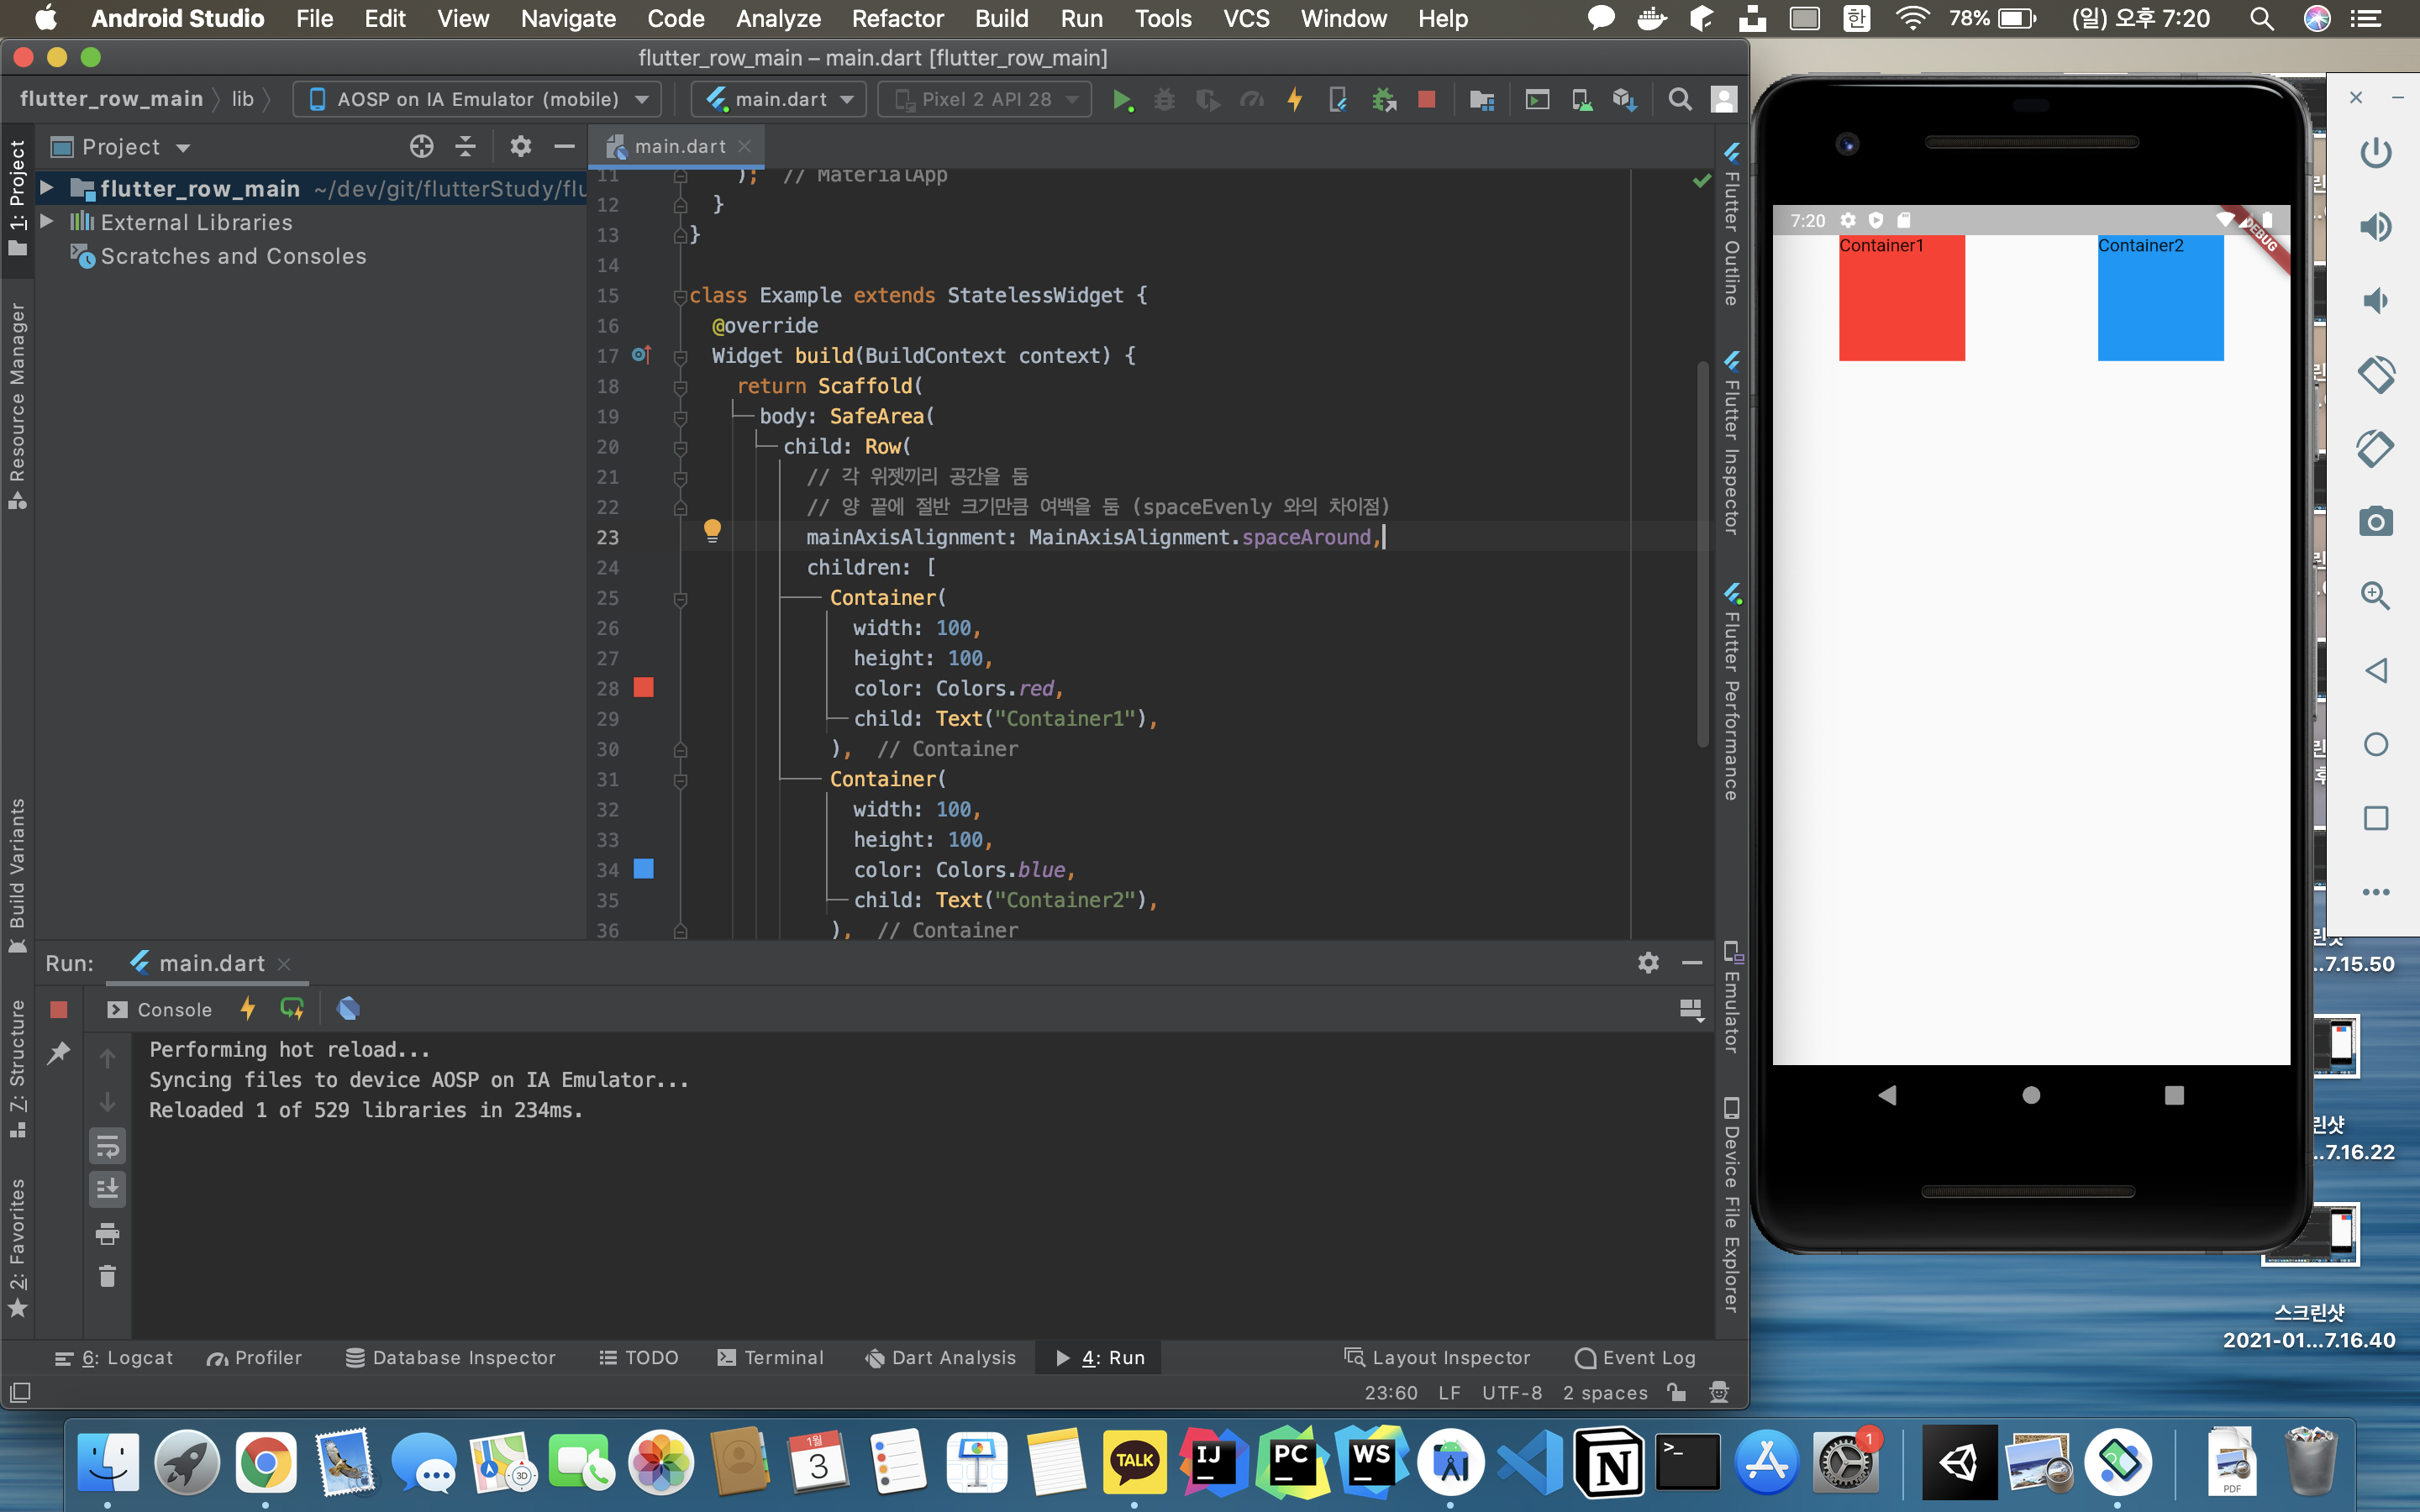
Row 위젯에서 가로 정렬을 할 때는 mainAxisAlignment 인자를 이용한다.
// 예시
Row(
  mainAxisAlignment: MainAxisAlignment.spaceBetween,
  ...
);
MainAxisAlignment.start
child 위젯을 왼쪽에 붙게한다.
import "package:flutter/material.dart";

void main() => runApp(MyApp());

class MyApp extends StatelessWidget {
  @override
  Widget build(BuildContext context) {
    return MaterialApp(
      title: "Row 위젯 예시",
      home: Example(),
    );
  }
}

class Example extends StatelessWidget {
  @override
  Widget build(BuildContext context) {
    return Scaffold(
      body: SafeArea(
        child: Row(
          mainAxisAlignment: MainAxisAlignment.start, // 왼쪽 정렬
          children: [
            Container(
              width: 100,
              height: 100,
              color: Colors.red,
              child: Text("Container1"),
            ),
            Container(
              width: 100,
              height: 100,
              color: Colors.blue,
              child: Text("Container2"),
            ),
          ],
        ),
      ),
    );
  }
}

MainAxisAlignment.center
child 위젯을 가운데로 정렬한다.
class Example extends StatelessWidget {
  @override
  Widget build(BuildContext context) {
    return Scaffold(
      body: SafeArea(
        child: Row(
          mainAxisAlignment: MainAxisAlignment.center, // 가운데 정렬
          children: [
            Container(
              width: 100,
              height: 100,
              color: Colors.red,
              child: Text("Container1"),
            ),
            Container(
              width: 100,
              height: 100,
              color: Colors.blue,
              child: Text("Container2"),
            ),
          ],
        ),
      ),
    );
  }
}
MainAxisAlignment.end
child 위젯을 오른쪽에 붙게 한다.
class Example extends StatelessWidget {
  @override
  Widget build(BuildContext context) {
    return Scaffold(
      body: SafeArea(
        child: Row(
          mainAxisAlignment: MainAxisAlignment.end, // 오른쪽 정렬
          children: [
            Container(
              width: 100,
              height: 100,
              color: Colors.red,
              child: Text("Container1"),
            ),
            Container(
              width: 100,
              height: 100,
              color: Colors.blue,
              child: Text("Container2"),
            ),
          ],
        ),
      ),
    );
  }
}

MainAxisAlignment.spaceEvenly
child 위젯 간의 공간을 두고, 같은 크기만큼 양 옆에 공간을 둔다.
class Example extends StatelessWidget {
  @override
  Widget build(BuildContext context) {
    return Scaffold(
      body: SafeArea(
        child: Row(
          mainAxisAlignment: MainAxisAlignment.spaceEvenly, // 같은 간격만큼 공간을 둠
          children: [
            Container(
              width: 100,
              height: 100,
              color: Colors.red,
              child: Text("Container1"),
            ),
            Container(
              width: 100,
              height: 100,
              color: Colors.blue,
              child: Text("Container2"),
            ),
          ],
        ),
      ),
    );
  }
}

MainAxisAlignment.spaceAround
spaceEvenly와 비슷하지만, child 위젯간의 공간을 두고, 절반 크기만큼 양 옆에 공간을 둔다.
class Example extends StatelessWidget {
  @override
  Widget build(BuildContext context) {
    return Scaffold(
      body: SafeArea(
        child: Row(
          // 각 위젯끼리 공간을 둠
          // 양 끝에 절반 크기만큼 여백을 둠 (spaceEvenly 와의 차이점)
          mainAxisAlignment: MainAxisAlignment.spaceAround,
          children: [
            Container(
              width: 100,
              height: 100,
              color: Colors.red,
              child: Text("Container1"),
            ),
            Container(
              width: 100,
              height: 100,
              color: Colors.blue,
              child: Text("Container2"),
            ),
          ],
        ),
      ),
    );
  }
}

MainAxisAlignment.spaceBetween
child 위젯간의 공간을 두지만, spaceEvenly와 spaceAround와는 다르게 양 옆에 공간을 만들지 않는다.
class Example extends StatelessWidget {
  @override
  Widget build(BuildContext context) {
    return Scaffold(
      body: SafeArea(
        child: Row(
          mainAxisAlignment: MainAxisAlignment.spaceBetween, // 각 위젯간의 공간을 둠
          children: [
            Container(
              width: 100,
              height: 100,
              color: Colors.red,
              child: Text("Container1"),
            ),
            Container(
              width: 100,
              height: 100,
              color: Colors.blue,
              child: Text("Container2"),
            ),
          ],
        ),
      ),
    );
  }
}

다른 글
2021/01/03 - [Flutter] - 플러터(flutter) - Row 세로 정렬 방법 (CrossAxisAlignment)
플러터(flutter) - Row 세로 정렬 방법 (CrossAxisAlignment)
Row 위젯에서는 crossAxisAlignment 인자값을 이용하여 세로 방향으로 정렬할 수 있다. // 예시 Row( crossAxisAlignment: CrossAxisAlignment.stretch, ... ); CrossAxisAlignment.start child 위젯들을 상단에..
memostack.tistory.com
2021/01/03 - [Flutter] - 플러터(flutter) - Column 가로 정렬 방법 (CrossAxisAlignment)
플러터(flutter) - Column 가로 정렬 방법 (CrossAxisAlignment)
Column 위젯을 가로로 정렬할때는 crossAxisAlignment 속성을 이용한다. CrossAxisAlignment.start start 는 default 값으로 왼쪽에 붙게 한다. import "package:flutter/material.dart"; void main() => runApp(M..
memostack.tistory.com
'Mobile > Flutter' 카테고리의 다른 글
| cmdline-tools component is missing 오류 조치 (Flutter 플러터) (2) | 2021.10.13 |
|---|---|
| 플러터(flutter) - Row 세로 정렬 방법 (CrossAxisAlignment) (0) | 2021.01.03 |
| 플러터(flutter) - Column 가로 정렬 방법 (CrossAxisAlignment) (0) | 2021.01.03 |
| 플러터(flutter) - Column 세로 정렬 방법 (MainAxisAlignment) (0) | 2021.01.02 |
| 플러터(flutter) - Container와 SizedBox의 차이 (0) | 2021.01.02 |
